Driving meaningful connections and enhancing customer engagement in life sciences
Learn about the most critical aspects of customer engagement and how to build and implement a reliable strategy for long-term success.

Salesforce positions Lightning as the future of Cloud CRM as the new and easy way to manage and close deals quicker by using dynamic views, mobile-ready UI, customizable homepage, etc. New public presentations are issued in Lightning, release notes of platform updates contain merely Lightning improvements, so new users are assured there is no time like the present to make the move.
Sound good? Absolutely.
What about the current Classic users? Obviously, migration to Lightning is a significant investment for big customized orgs and ROI should be carefully considered. But Lightning gives you options. You can go for 100% migration, or leave some features on the Classic back-end with a new redesigned UI on Lightning. With no further plans for improvements on Classic, Salesforce releases new Lightning functions 3 times a year with a focus on making it better than Classic. That is why a Salesforce Lightning Migration Guide from Classic that dwells on both technical and user analysis will be a useful tool.
With 42% of our clients’ apps already using Lightning, and 25% of those apps currently in the process of Lightning migration, we have been immersed in Salesforce innovations from the beginning, and have developed a whole set of best practices.

Salesforce provides an out-of-the-box Migration Assistant that adds all objects and data to Lightning. It gives you a step-by-step guide on how to activate Lightning Experience for your organization and your users; is a completely harmless operation; and all you need is five minutes to activate all process automation, such as workflow, sharing rules, record types, page layouts and data. You can find Migration Assistant in the Setup.
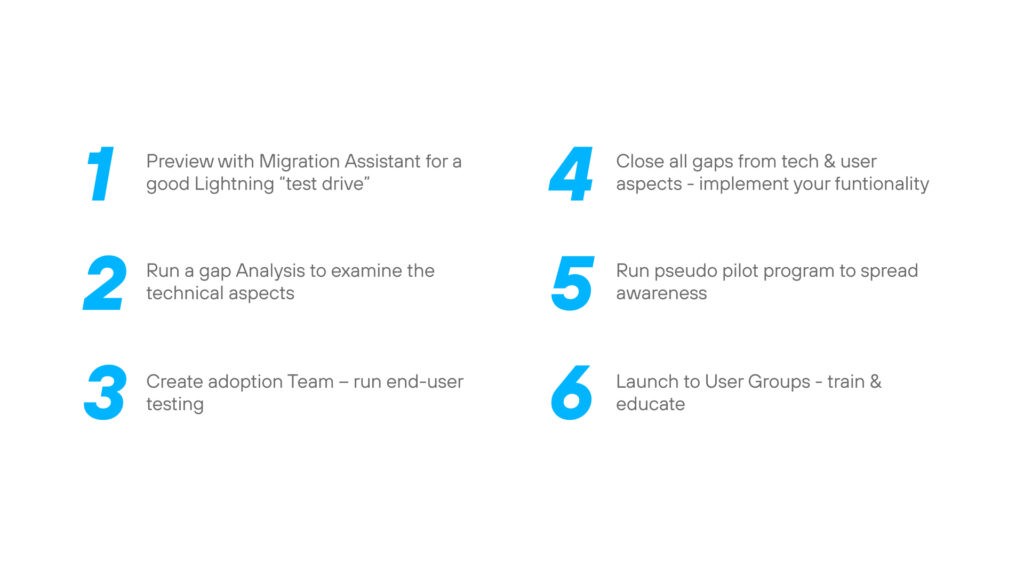
Salesforce Migration Assistant gives you a chance to create a Preview of Lightning Experience. That means Lightning Experience is not yet available for you or your organization. Think of it like a good test drive where you can check “out of the box” Salesforce functionality and prepare for the next step before complete activation. Our practice shows that Preview is a valuable means to explore your production org in Lightning Experience, so you can see exactly how your real data and your current customizations work in the new interface. It is always good to have a try-before-you-buy option.
Run a Gap Analysis and examine the technical aspects. You tried it out and it looks great so far, but unfortunately, there are some gaps between Salesforce Classic and Lightning Experience. This is your chance to find out what was missed in the automatic conversion process, such as missing default Visualforce pages, custom buttons with javascript context, and a list button. Even when they are there, they look somewhat ancient. In future releases, they will definitely cover gaps, but for now you can use this resource to check out what is not yet done. Depending on the size of your project or entire organization, Gap Analysis can take from one week to two months. No worries though. There always exists a workaround, and you just need to find it.
→ Detect unpredicted behavior in your custom code through functionality, such as catching and logging exceptions in Salesforce.
“Some features like Divisions, Territory Management, Manual Sharing are not yet available in Lighting Experience, but Salesforce plans new releases 3 times a year with a roadmap when to expect at least some of them. But, in the meanwhile, if they are critical, you can still switch to Classic view and use them to the fullest.”
Create an Adoption Team and run end-user testing. Pick a good cross section of users in your company, e.g., users from various departments, partners, sales reps, developers, etc., to try out the system features. The users should have some actual experience with Lightning so that they can help you identify missing pieces and pitfalls in the converted custom or standard apps. This is the point where usability and high-tech analysis come together.
“Gap analysis and end-user testing work as an integrated whole complementing each other: tech and usability analysis. They both present additional critical information for BAs, product owners, project managers, etc., for further successful implementation.”
It’s time to close all gaps between the two editions of Salesforce according to your needs, and then implement all the new great features that Lightning offers: App Builder, Kanban List View, Sales and Service Console, new Dashboards and even more. This step also requires a proficient development team and collaboration with business to figure out which pages can be converted to Lightning components, and which can be pushed to the next release. Gradually you will adopt all Lightning features that help your company be more productive, close deals and cases faster, and implement sophisticated development solutions in the new platform.
Run a Pilot program, which not only helps to further identify deficiencies, but serves as “public relations” for the rest of the company. Your workers need to like Lightning before they will easily adopt it. Many of our clients say that this hint alone made the final adoption process easier and faster.
A first launch to specific User Groups (with training, feedback and support, as opposed to launching for everyone at once) may take some time. But as a reward, you will get much more than an exclusive and robust UI with hundreds of new features not available in Classic for Sales, Service, and Marketing or CPQ team. This approach will enable your technical team to develop comprehensive, safe and reusable components or applications for your business, as well as a deeper knowledge of how each group will use the system.
“Salesforce Lightning Migration Guide – 6 Simple Steps That Make It EasyWe have worked on a complex pharma solution where the main system which was focused for internal use was built with the help of Lightning components. There were community portals for external users as well, e.g., clinics, doctors, etc. We easily reused the ready-made components from the main system to be replicated at the Community portals with slight modifications. Fairly speaking, as compared to the previous Visualforce experience, this step decreased development time by 2 to 3 times.”
Here you can read our Lighting developer guide to get familiar with the best practices to make your experience even better.
Why do our clients tend to use Lightning Experience? Simply because they are thinking about ROI and business efficiency. Lightning is here with an advanced mobile-ready UI, smart dynamic views, enlarged and user-friendly dashboards, drag-and-drop functionality and more to come. So, it’s all about improving the user experience and reshaping how Sales, Service and Marketing teams connect with customers.
→ Get help with custom Salesforce development, setup and configuration for your organization
Ready to innovate your business?
We are! Let’s kick-off our journey to success!